Tracking Website Views Using AWS Lambda and DynamoDB
In this phase of my portfolio website project (AWS Cloud Resume Challenge), I added a view counter to track the number of visitors to the site. To achieve this, I used AWS Lambda, DynamoDB, and JavaScript. The Lambda function increments and fetches the current view count stored in DynamoDB every time a user visits the website, and this count is displayed on the site using JavaScript.
In this blog, I’ll guide you through the following steps:
- Creating a DynamoDB table to store the view count.
- Developing an AWS Lambda function that increments and fetches the view count.
- Using the Lambda Function URL to call the Lambda function directly from the website via JavaScript.
By the end of this blog, you’ll have a working setup to track and display view counts on your website.
Project Overview
- AWS DynamoDB: Stores the view count.
- AWS Lambda: Increments and fetches the view count from DynamoDB.
- JavaScript: Calls the Lambda function URL and displays the view count on the website.
Prerequisites
Before starting, make sure you have the following:
- AWS Account: You need an AWS account to access services like Lambda and DynamoDB.
- Basic Knowledge of Python and JavaScript: The Lambda function is written in Python, and JavaScript is used to display the view count on your website.
- Portfolio Website Deployed on AWS: This project assumes you’ve already deployed your website (refer to the Part 1).
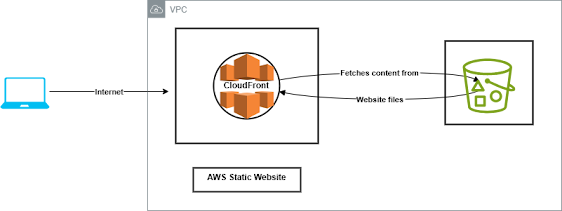
Architecture Diagram

Step 1: Setting Up DynamoDB
We’ll first create a DynamoDB table to store the website view count.
- Create a DynamoDB Table:
- Navigate to AWS Management Console and go to DynamoDB.
.png)
- Click Create Table.
.png)
- Set Table Name to portfolio-viewcount (I have given it this name, you can give any name).
.png)
- Set the Primary Key to
id(String). - Leave the rest of the settings as default and click Create.
.png)
- Add an Initial Item:
- Once the table is created, go to the Items tab and click Create Item.
- click on the tables, then tap on actions and select create item.
.png)
- Set the Primary Key as
id = '1', and add a new attributeviews as a numberto initialize the view count at 0.
.png)
.png)
- Click Create Item.
Step 2: Creating the Lambda Function
Now, we’ll create an AWS Lambda function that increments and retrieves the view count from the DynamoDB table.
- Create a Lambda Function:
- Go to the Lambda service in the AWS Management Console.
.png)
- Click Create Function.
.png)
- Choose Author from scratch and give the function a name, such as viewcount-.
.png)
- Set the Runtime to Python 3.8 (or later).
- Now tap on additional configurations, Enable Function URL.
- Set Auth type to NONE, also enable Cross-Origin Resource Sharing (CORS).
.png)
.png)
- Now, Click on Create Function.
Write the Lambda Function Code:
After the Lambda function is created, paste the following Python code into the code editor:-
This function interacts with DynamoDB to:
- Retrieve the current view count using the primary key
id: 0. - Increment the view count by 1.
- Update the new view count back to DynamoDB.
- Return the updated count as a JSON response.
After adding the code, click Deploy to save your changes.
Step 3: Set Lambda Permissions (IAM Role)
- In the Lambda function's Configurations tab, click on the role under Permissions to modify its permissions.
.png)
- Here, you'll find role of our Lambda Function, Click on the link (under role name).
- Click on persmissions, Select add permissions.
- Attach the AmazonDynamoDBFullAccess policy to this role to allow the Lambda function to interact with DynamoDB.
.png)
Step 4: Cross-Origin Resource Sharing Configuration
- To enable CORS goto Lambda Function Console
- Navigate to configuration tab and click on function url section
.png)
- Click on edit, and scroll till CORS configuration section
- add your domain name or website url there which you want to allow access to lambda url.
.png)
- click on save.
Step 5: Integrating Lambda with JavaScript
- You can see the Lambda Function URL on the right side of Lambda Function Console page.
- Copy that URL
Now, we’ll add a simple JavaScript function to your website that calls the Lambda Function URL and updates the view count on the page.
Add JavaScript to Your Website:
In the HTML file of your website, add this JavaScript code to the bottom of your <body> tag or in a separate .js file:
Displaying the View Count:
Make sure your HTML contains an element with the class counter-number where the view count will be displayed:
example:-
This will be dynamically updated with the current view count every time the page loads.
Step 6: Testing the View Counter
After deploying your updated website, visit the site in your browser. Each time the page is loaded, the JavaScript function will call the Lambda Function URL, which triggers the Lambda function to increment the view count and return the updated value.
You should see the view count increase every time you refresh the page!
What I Learned from This Project
This project provided an opportunity to work with several core AWS services, and here are the key concepts and skills I gained:
Creating and Using DynamoDB Tables:
- I learned how to set up a DynamoDB table to store non-relational data. In this case, I created a simple table to track website view counts.
- I explored how to define primary keys for uniquely identifying items and how to configure basic table settings like read/write capacities.
- Interacting with DynamoDB using boto3 (the AWS SDK for Python) was a key takeaway, especially learning how to perform CRUD (Create, Read, Update, Delete) operations using the
get_itemandput_itemmethods.
Creating and Configuring Lambda Functions:
- Writing and deploying Lambda functions was a major part of this project. I learned how to author a Lambda function from scratch using Python as the runtime.
- Lambda’s serverless nature means no infrastructure management, so I focused on the application logic that incremented the view count and communicated with DynamoDB.
- I gained experience in configuring the Lambda execution environment and attaching the correct IAM role to give Lambda the necessary permissions to read and write from DynamoDB.
Using Lambda as an API for Accessing DynamoDB:
- In this project, I effectively turned my Lambda function into a lightweight API. The function acted as an intermediary, processing the website’s request to access DynamoDB and returning the updated view count.
- This setup demonstrated how AWS Lambda can be used as a backend service for small, serverless applications that don’t require complex backend infrastructure.
Lambda Function URLs:
- I utilized the relatively new feature of Lambda Function URLs to expose my Lambda function without needing to set up and manage an API Gateway. This simplified the process of calling the Lambda function from my website.
- By setting the authorization type to "NONE," I made the function publicly accessible, but I also understood the importance of securing such endpoints for production use to prevent misuse.
Configuring CORS (Cross-Origin Resource Sharing):
- One important step in integrating the frontend (website) with the Lambda function was configuring CORS. CORS allows or restricts which domains can access the Lambda function from a browser, which is a key security consideration when building web applications.
- By properly configuring CORS in the Lambda Function URL settings, I ensured that only requests from my domain could fetch the view count, preventing unauthorized access from other websites.
Integrating Frontend and Backend:
- A major highlight of this project was integrating backend services (Lambda and DynamoDB) with the frontend website using JavaScript.
- The JavaScript code on the website fetched the view count by calling the Lambda Function URL and updated the HTML content dynamically. This interaction between the client-side code and serverless backend services made the website more interactive and functional.
Handling Asynchronous JavaScript (fetch API):
- I deepened my knowledge of asynchronous JavaScript using the
fetch()API to make HTTP requests to the Lambda Function URL. Understanding how to handle asynchronous operations withasync/awaitin JavaScript allowed me to seamlessly update the website without page reloads.
- I deepened my knowledge of asynchronous JavaScript using the
AWS IAM Roles and Permissions:
- Managing security and permissions was another important takeaway. I learned how to grant the correct permissions to the Lambda function using AWS Identity and Access Management (IAM), ensuring that the function had only the necessary rights to access DynamoDB and nothing more.
- Following the principle of least privilege, I was able to control resource access at a fine-grained level to prevent security risks.
Scalability and Cost-Effectiveness with Serverless Architecture:
- Using serverless architecture provided me with a highly scalable and cost-effective solution for this project. Lambda automatically scales based on traffic, and DynamoDB is designed to handle large amounts of data with minimal management overhead.
- This approach demonstrated the power of serverless architecture, where I could focus on the business logic rather than worrying about infrastructure, scaling, or server maintenance.
Resource Cleanup and Cost Management:
- After completing the project, I also learned the importance of cleaning up resources in AWS, such as deleting Lambda functions and DynamoDB tables that are no longer in use, to avoid unnecessary costs. AWS provides cost-efficient solutions, but unused resources can still incur charges if left active.
Conclusion
In this phase of the project, I successfully integrated AWS Lambda and DynamoDB to track and display website view counts on my portfolio. By leveraging the simplicity of Lambda Function URLs, I was able to connect my backend logic directly to the frontend, making the website more interactive and dynamic without the need for additional infrastructure like API Gateway.
This project taught me valuable lessons in key AWS services, such as creating and managing DynamoDB tables, authoring and configuring Lambda functions, and securing API calls using CORS. I also gained hands-on experience in handling permissions with IAM roles, ensuring secure access to my resources while keeping the setup scalable and cost-effective using serverless architecture.
By combining AWS services with frontend technologies, I was able to build a seamless integration between the backend and the client side, showing how powerful and accessible serverless architectures are for both small projects and large-scale applications.
This project not only enhanced my technical skills but also deepened my understanding of cloud-native architectures and best practices for security, scalability, and efficiency when developing web applications. Looking ahead, I plan to explore more advanced configurations, such as enabling authentication or adding monitoring for improved performance insights, while continuing to build on this strong foundation.
.png)
Comments
Post a Comment